There’s a moment when the rifle settles, your breathing slows, and the reticle sits like it was drawn onto the world itself. That moment isn’t luck. It’s the product of careful mounting, clean fundamentals, and a scope adjusted in a way that matches your eyes, your rifle, and the conditions you’re shooting in. I’ve coached new hunters on blistering summer ranges and watched seasoned competitors chase phantom zeros in shifting autumn air. The fundamentals don’t change, but the way you apply them—windage and elevation, parallax and reticle focus, MOA vs MRAD—must be tailored to your platform and your purpose.
This guide is the scope adjustment guide I wish every shooter had when they first mounted glass on a rifle. It’s built from the bench and the field, with a practical bias: we’ll cover how to adjust a rifle scope correctly, how to sight in a rifle scope at typical distances, how to adjust scope windage and elevation using both MOA and mils, and how to diagnose problems like a scope that won’t hold zero or a canted reticle. Whether you’re tuning a 3–9×40 for deer season, dialing a long-range optic with a zero stop, or setting up an air rifle, this is the thorough, real-world approach.
Before You Touch the Turrets: Fit, Mount, and Baseline Setup
Scope adjustments start long before your first click. If the scope isn’t mounted correctly or your eye isn’t positioned consistently, windage and elevation changes won’t land where you think they should. This base work is the most overlooked difference between “noisy” groups and a crisp, predictable zero.
Mounts and ring height: A stable start
- Choose a mount or rings that match your shooting style and platform. A one-piece mount on an AR-15 can simplify alignment and height; separate rings often work best on bolt guns.
- Ring height should place the centerline of the optic roughly in line with your natural head position. Too low and you’ll strain your neck; too high and you’ll lose cheek weld and consistency. On most hunting rifles, “low” or “medium” rings that clear the objective bell and bolt handle are right. On ARs, a cantilever mount usually positions the scope around 1.5–1.93 inches above the rail for a comfortable upright posture.
- Torque matters. Over-tightening can dent tubes and cause tracking issues; under-tightening invites scope creep. Use a torque wrench and follow manufacturer specs for bases, rings, and caps. Even “close enough” human feel can be off by a lot.
Level everything
- Level the rifle in a vice or on bags. Level the scope to the rifle, not to the world. A plumb line at the target, viewed through the scope, is more reliable than eyeballing flat surfaces on the rifle.
- A canted reticle is silent sabotage. If the vertical crosshair isn’t true, elevation corrections will also add windage error as distance climbs.
Establish eye relief and the eye box
- Slide the scope fore and aft to find a full, shadow-free sight picture at your highest planned magnification. On heavy-recoiling rifles, leave a touch more eye relief for safety; on lighter platforms, prioritize a repeatable, natural head position.
- The “eye box” is the volume of space where your eye sees a full image. More forgiving scopes are easier to shoot quickly from awkward positions. If you’re struggling with scope shadow, reassess ring height, stock fit, and your position before spinning turrets.
Boresight to save time
- Visual boresighting: On bolt guns, remove the bolt, secure the rifle, and center the target through the bore. Adjust the scope until the reticle sits on the same spot.
- Laser boresight: Handy for ARs and rimfires. It gets you on paper fast, but it’s not a substitute for live-fire zeroing.
The Reticle Focus (Diopter) Comes First
Many shooters skip this step and live with fuzzy crosshairs and eye strain. The diopter adjustment focuses the reticle to your eye. Done right, the reticle looks sharp against any background at any distance.
- Start with the scope on a low or mid magnification and point at a blank, bright background like the sky or a white wall. You don’t want your eye trying to focus on a target—only the reticle.
- Close your eyes for a moment, open, and look through the optic for just a second or two. If the reticle isn’t razor-sharp immediately, adjust the diopter ring slightly. Repeat the short glances until it’s crisp on that first impression. Don’t stare; your eye will auto-focus and mislead you.
- If you wear glasses: Focus the reticle with your glasses on if you plan to shoot with them. Astigmatism can make illuminated reticles look starry; a clear etched reticle without illumination should still look crisp when the diopter is right.
- Lock the diopter if your scope has a locking ring. If not, mark it with a paint pen so you’ll notice if it moves.
Eye Relief and Eyebox: Comfort and Safety
A scope adjusted to the wrong eye relief is like shoes two sizes off—you can make it work, but everything else becomes harder. Set eye relief at your highest expected recoil and magnification. On hunting rifles, I like a natural position at 6–8x with a full sight picture and no scope shadow. On precision rifles, I bias slightly higher in magnification so high-power work doesn’t force a head shift. If you find a persistent crescent of scope shadow, the common culprits are:
- Scope too far forward/back: Move it in small increments and re-test.
- Ring height mismatched: Too high makes it hard to settle; too low may force neck strain.
- Cheek weld inconsistent: Adjust comb height, add a cheek riser, or tune your position.
- Over-magnification: Dial back. Higher magnification narrows the eye box and punishes minor head movement.
Level the Reticle: Solve Cant Before It Starts
Cant is the hidden thief of clean adjustments, and I’ve seen good shooters chase “mystery wind” that was just a tilted scope. Two reliable ways to level:
- Plumb line method: Hang a weighted string downrange. Level the rifle, then rotate the scope in the rings until the vertical crosshair matches the string. Tighten ring caps incrementally in a cross pattern, checking alignment as you go.
- Bubble level pairing: One level on the rifle’s rail or action; a second that sits on the turret cap. Match both to the same “level” reading.
Note on canted bases: A 20 MOA base doesn’t tilt your reticle; it angles the scope for more elevation. You’ll likely be near the bottom of the elevation travel at your zero, which is good for dialing long-range.
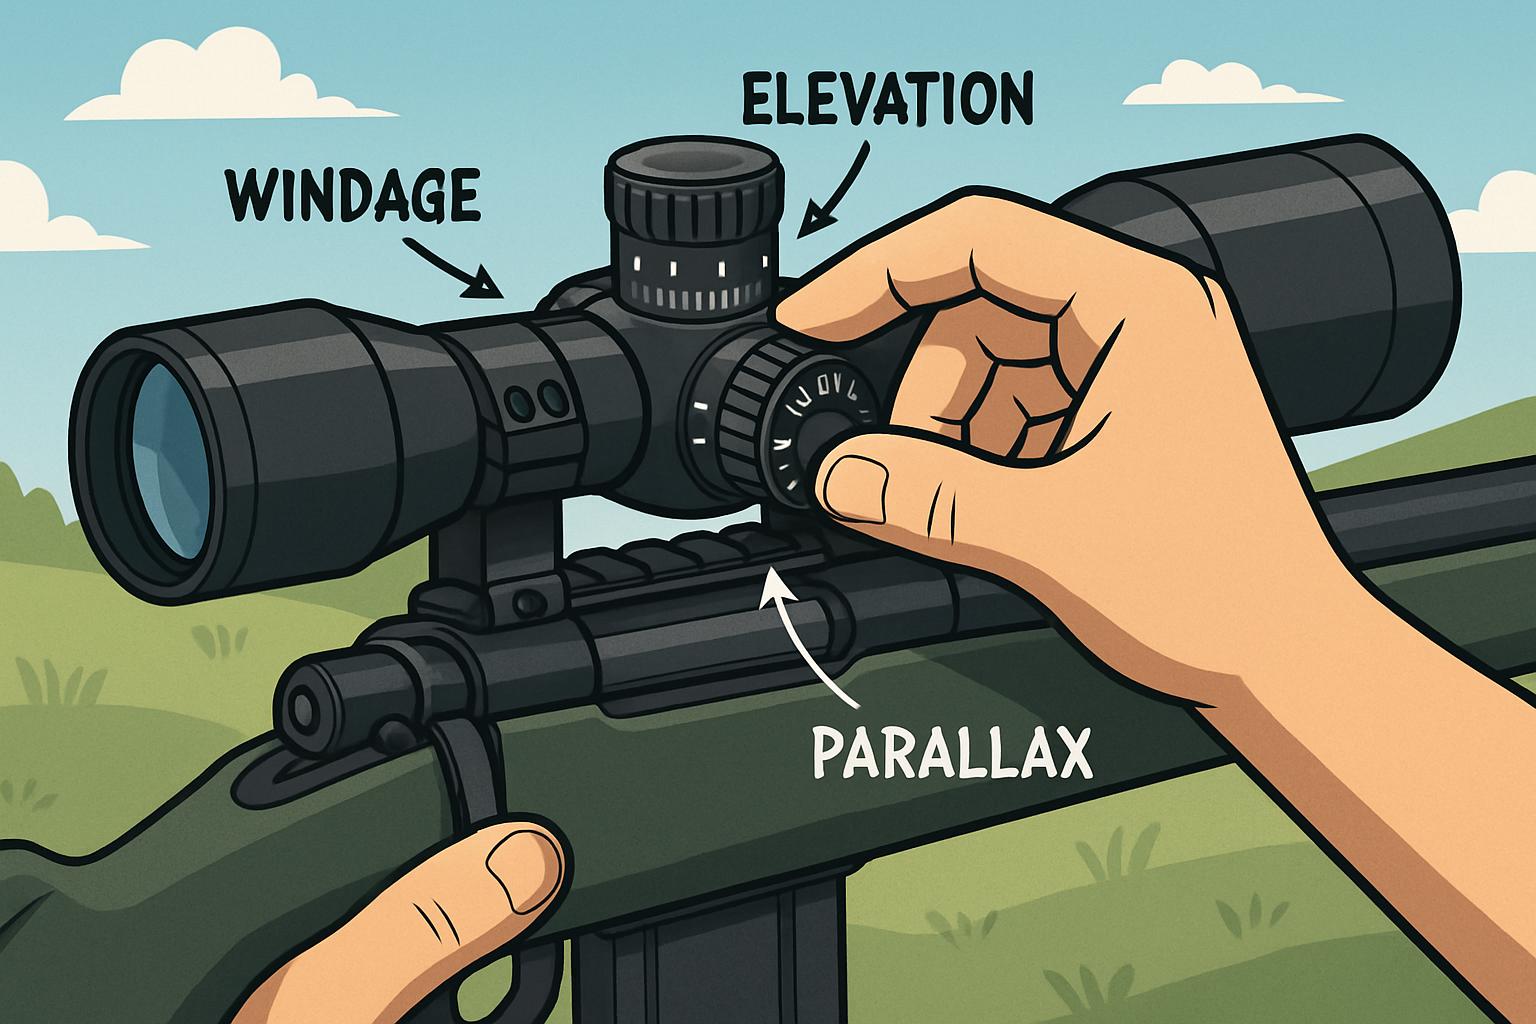
How Rifle Scope Adjustments Work: Windage, Elevation, Clicks
Imagine the reticle as a floating coordinate system. Turning the elevation turret moves the reticle up or down relative to the image inside; turning the windage turret moves it left or right. When you adjust “UP,” you’re actually moving the reticle up—so the bullet strikes higher. It’s counterintuitive until you think in those terms.
- Windage turret: Moves point of impact left/right.
- Elevation turret: Moves point of impact up/down.
- Click value: The distance moved per click at a standardized distance. Most scopes are either 1/4 MOA per click (imperial system) or 0.1 mil per click (metric).
MOA vs MRAD Adjustments Explained
Both systems work equally well. Choose the one that matches your shooting partners, training materials, and reticle subtensions. The difference is simply the unit of angular measurement.
- MOA (Minute of Angle): Roughly 1 inch at 100 yards. More precisely, 1 MOA is 1.047 inches at 100 yards, 2.094 inches at 200, and so on. A 1/4 MOA scope moves about 0.26 inch per click at 100 yards.
- MRAD (Milliradian): 1 mil is 10 cm at 100 meters, roughly 3.6 inches at 100 yards. A 0.1 mil click moves exactly 1 cm at 100 meters, and about 0.36 inch at 100 yards.
Table: MOA vs MRAD quick conversions
| Unit | At 100 yd | At 100 m |
|---|---|---|
| 1 MOA | ≈ 1.047 in | ≈ 2.91 cm |
| 1/4 MOA click | ≈ 0.26 in | ≈ 0.73 cm |
| 1 mil | = 3.6 in | = 10 cm |
| 0.1 mil click | = 0.36 in | = 1 cm |
Metric-first example:
- If your group is hitting 8 cm low at 100 meters, you need 0.8 mil up (8 cm ÷ 10 cm/mil). On a 0.1 mil turret, that’s 8 clicks up.
Imperial example:
- If you’re 2 inches right at 100 yards, you need 2 MOA left. On a 1/4 MOA turret, that’s 8 clicks left (2 ÷ 0.25).
What Does One Click Mean?
This is where “understanding scope clicks” becomes practical. The click value is printed on the turret or in your manual. Three common setups:
- 1/4 MOA per click: Each click moves the point of impact about 0.26 inch at 100 yards, 0.52 inch at 200, 1.04 inches at 400.
- 1/8 MOA per click: Fine adjustment for rimfire and benchrest. Half the movement of 1/4 MOA.
- 0.1 mil per click: Each click is 1 cm at 100 meters, 2 cm at 200, 5 cm at 500; at yards, think roughly 0.36 inch at 100 yards.
“How many clicks is 1 inch at 100 yards?”
- MOA: 1 inch is close to 1 MOA; on 1/4 MOA clicks, that’s about 4 clicks.
- MRAD: 1 inch is 0.278 mil; on 0.1 mil clicks, that’s roughly 3 clicks (0.3 mils ≈ 1.08 inches).
Turret Directions: Which Way to Turn
Most modern turrets are clearly marked with arrows: “UP” for elevation, “R” for windage. If your group is low, turn the elevation turret in the “UP” direction. If your group is left, turn windage toward “R.” Some European scopes flip these conventions; always confirm markings. For any confusion, do a quick “box test” on paper at close range to verify movement.
Zero Stop, Rev Indicator, Capped vs Exposed Turrets
- Zero stop: A mechanical stop that prevents dialing below your zero. It’s a lifesaver in low light and in competition. Once you’ve sighted in, set the zero stop so you can spin back down to your baseline without looking.
- Revolution indicators: Marks or pop-ups that show which rotation you’re on. They keep you from getting lost on tall turrets when dialing long distance.
- Capped turrets: Common for hunting scopes. They protect your zero; use holdovers or a ballistic reticle for field shots.
- Exposed turrets: Favored for precision shooting where you dial frequently. Ensure they lock or have tactile clicks to avoid accidental movements.
Parallax Adjustment on a Scope vs Reticle Focus
Parallax isn’t just “blurry image.” It’s when the reticle appears to move relative to the target if your eye shifts off-center. This can cause point-of-impact errors even when the image looks fine.
- Adjustable parallax (side focus or adjustable objective): Moves the internal focus to eliminate parallax at your target distance. When properly set, you can move your head slightly and the reticle won’t drift across the target.
- Reticle focus (diopter): Adjusts your eye’s focus of the reticle. This stays constant once set for your eye; don’t “fix” a blurry target with the diopter.
How to set parallax:
- Start at the actual distance you’re shooting. Use the side focus knob to sharpen the target image while lightly shifting your head around the eye box. When you see no reticle float, you’re close.
- Don’t trust the yardage numbers on the knob as gospel. They’re approximate, temperature dependent, and vary by eye. Use them as starting points only.
- If you shoot fast inside typical hunting distances, some parallax error is tolerable. For small targets or long-range precision, take the time to nail it.
Step-by-Step: How to Zero a Scope and Adjust at Common Distances
A clean zero puts your clicks and holdovers on a predictable grid. Everything after that—dialing elevation, wind calls, BDC reticles—works because your zero is honest.
Range setup that saves ammo
- Solid rest: Bags or a bipod with a rear bag. Eliminate wobble. Prone is best; a steady bench can work.
- Stable target: Use a high-contrast grid or bull. If you have a reticle with subtensions, a 1-inch grid at 100 yards or a 1 cm grid at 100 meters simplifies math.
- Mild conditions: Zero in light winds. If you must zero in a breeze, aim to average out gusts or wait for lulls.
- Ammo consistency: Zero with the ammunition you’ll actually use. Change ammo, re-confirm zero. Suppressors, brakes, and barrel heat also shift point of impact—normalize your zero to your real-world setup.
Sighting in a rifle scope at 100 yards (or 100 meters)
- Boresight to get on paper.
- Fire a careful 3–5 shot group at the center. Don’t chase single shots; chase the center of your group.
- Measure the offset. Example: The group center is 3 inches low and 1.5 inches right at 100 yards.
- Convert to clicks.
- MOA: 3 inches ≈ 3 MOA; at 1/4 MOA per click, dial 12 clicks UP. For 1.5 inches right, dial 6 clicks LEFT (assuming your turret marks movement direction; adjust accordingly).
- MRAD: At 100 meters, if you’re 8 cm low and 4 cm right, dial 0.8 mil UP and 0.4 mil LEFT.
- Fire another group. Confirm. Fine-tune with half the initial corrections if needed.
- Set your zero stop (if applicable) and re-index turrets to “0.” Confirm one more group to make sure nothing shifted while you set the stop.
Adjusting a rifle scope at 50/200 yards
A 50/200-yard zero on AR-15 carbines is popular because the trajectory crosses the line of sight near both distances, giving a practical point-blank range on torso-sized targets.
- Zero at 50 yards: Fire a group, adjust to center using your click math. Confirm at 200 if your range allows; small elevation differences can show up due to height over bore and ballistic curve.
- For .22 LR, a 50-yard zero makes sense for small-game and steel out to 100. If you mostly shoot inside 50 yards, consider a 25–35 yard zero for convenience and fewer elevation holds.
Zeroing in meters: MRAD example
At 100 meters, your group center is 6 cm low and 2 cm left.
- Dial 0.6 mil UP and 0.2 mil RIGHT.
- Fire another 3–5 shot group. Confirm and refine.
- Reset your zero stop if equipped. Re-index the turret to 0.
Fine details that matter
- Use the center of your group, not the best two shots. Consistency beats luck.
- Allow barrels to cool if heat causes stringing. Heat mirage off the barrel can distort your sight picture at magnification.
- If the scope isn’t tracking correctly (your measured clicks don’t move the group as expected), verify mount torque, ring alignment, and consider a tracking test.
Platform-Specific Notes: Centerfire, Rimfire, Air Rifle, AR-15, Muzzleloader, Crossbow
No two platforms behave exactly alike. The principles of windage and elevation don’t change, but the context does.
Centerfire hunting rifles
- Typical setup: 3–9x or 2–10x with capped turrets, 100-yard zero in the U.S., 100-meter zero internationally. Some prefer a 200-yard zero for extended point-blank range on big game.
- Adjustments: Rarely dial in the field. Use reticle holdovers (BDC or hash marks) for quick corrections. Verify BDC reticle calibration at the range; it depends on velocity, altitude, and zero.
- Eye relief and recoil: Leave a little extra room if you shoot offhand or in odd positions.
Rimfire .22 setups
- Typical setup: 2–7x or 3–9x, often with finer clicks (1/8 MOA) and adjustable parallax down to 50 yards or less.
- Zero: 50 yards is versatile for plinking and small-game. Wind pushes .22 LR hard; don’t be surprised by big windage holds.
- Adjustments: Rifle scope settings explained for rimfire often focus on parallax and fine elevation control at close range. Keep a dedicated dope card for your ammo.
Air rifle scope adjustments
- Springers vs PCP: Spring-piston rifles recoil in both directions and can be brutal on scopes. Use airgun-rated optics. PCPs are softer shooting and more forgiving.
- Parallax: Air rifle scopes often have parallax adjustment down to 10 yards. Use it. Small errors at short distances loom large.
- Zero: Commonly 20–30 meters. Be mindful of scope height over bore; close-range holds can be surprising.
AR-15 optics
- Typical setup: 1–6x or 1–8x LPVO, or a mid-magnification optic like 2.5–10x. Many shooters like a 50/200-yard zero to minimize dialing.
- Adjustments: For defensive or action shooting, confirm a 50/200 approach and memorize holds at 10–15 yards (height-over-bore matters). For precision or varmint work, a 100-yard zero and dialing elevation makes sense.
Muzzleloader scope setup
- Recoil: Similar to magnum centerfires, so ensure adequate eye relief. Solid mounts and correct torque are essential.
- Zero: Often 100 yards, but verify with your specific projectile and charge. Drop can be pronounced past 150–200 yards; a BDC reticle matched to your load helps.
Crossbow scope adjustments
- Many crossbow scopes use pre-calibrated speed rings and multiple aiming points rather than traditional turrets. You’ll “zero” at a known distance—often 20 yards—then fine-tune speed settings to align the additional stadia with 30, 40, and 50 yards.
- Parallax: Typically fixed. Minimize head movement to avoid inconsistency.
Using Holdovers vs Turret Dialing
Both methods work. Your discipline, target size, and time pressure dictate which is best.
Holdovers with BDC or hash reticles
- Pros: Fast, less chance of getting “lost” on turrets, great for hunting and dynamic shooting. No need to re-zero after dialing.
- Cons: Requires careful verification. The BDC references etched in your reticle rarely match your real ballistic curve perfectly. Confirm each hash at real distances.
Turret dialing (elevation and occasionally wind)
- Pros: Precise and repeatable for small targets at distance. A zero stop and clear rev indicator make it reliable.
- Cons: Slower in the field. Requires disciplined re-zeroing of the turret after the shot. In gusty winds, dialing wind is often counterproductive—hold instead.
First focal plane vs second focal plane
- FFP: Reticle subtensions stay true at any magnification. Ideal for PRS or variable-distance shooting where you use holds a lot.
- SFP: Reticle subtensions are true at one marked magnification (often max). For hunting and casual shooting, SFP is simpler; just remember the correct magnification for your holds.
Environmental and Ballistics Factors That Shift Your Zero
Does temperature and altitude affect your zero? Absolutely. The trick is knowing how much and when it matters.
- Temperature: Colder powder burns slower; velocity drops; point of impact generally drops at distance. The exact effect depends on your load and barrel. At close zero distances, shift may be minor; at longer ranges it becomes significant.
- Altitude and density altitude: Thinner air at higher altitude offers less drag; bullets fly flatter. Your 500-yard dope from sea level won’t match the mountains.
- Light and mirage: Bright light can make reticles appear thinner; heavy mirage can make targets swell and shimmer. Break shots in consistent light when confirming zero, and use parallax to cut mirage distortion.
- Ammunition lot and barrel condition: Change ammo, re-check zero. Clean or dirty barrels can impact point of impact. Some barrels “settle” after the first few fouling shots.
- Suppressors and muzzle devices: Expect a point-of-impact shift when adding or removing. It may be repeatable; confirm before relying on it.
- Torque and bedding: Shifting action screws or mount torque will move your zero. If your zero wandering feels random, a torque check is step one.
Troubleshooting: Why Shots Hit Left/Right/High/Low and What to Do
When a scope won’t hold zero or adjustments don’t track, it’s usually solvable with a methodical approach. Start with the symptom, then test likely causes in order of simplicity.
Table: Symptom-to-cause troubleshooting
| Symptom | Possible Causes | Fixes |
|---|---|---|
| Shots hitting low/high with correct clicks |
|
|
| Shots hitting left/right inconsistently |
|
|
| Scope not tracking correctly |
|
|
| Running out of elevation adjustment |
|
|
| Canted reticle / tilted crosshairs |
|
|
| Scope parallax causing blurry target or shifting POI |
|
|
| Scope creep / rings slipping |
|
|
| Inconsistent point-of-impact shift after transport |
|
|
A note on shimming: Shimming bases or rings to correct elevation can work, but it introduces stress if done poorly. A canted base is a cleaner solution. If you must shim, use purpose-made shims and apply evenly under the base, not inside the rings.
Accessibility and Ergonomics: Aging Eyes, Glasses, Low Light
Everyone’s eyes change. Scope settings that worked a decade ago might fight you now. Adjustments that honor your vision make everything else easier.
- Diopter: Re-do your reticle focus with your glasses if you shoot with them, or without if you don’t. This one step reduces fatigue massively.
- Magnification: Use only as much as you need to resolve the target. Over-magnification constricts your eye box and magnifies your wobble. In low light, a moderate magnification gives a brighter image by increasing exit pupil.
- Reticle thickness and illumination: Fine reticles are great on paper, but in dim timber or heavy cover, a slightly bolder reticle or gentle illumination helps you find the crosshairs without blooming.
- Eye relief and stock fit: Aging necks appreciate a neutral head position. Adjust ring height or add a cheek riser to keep everything comfortable and repeatable.
- Astigmatism: Illuminated dots can starburst. Keep brightness just high enough to see without flaring; rely on the etched reticle edges for precision.
Accessory Guide: Tools and Upgrades That Make Adjustments Easy
Every shooter benefits from a small kit of setup tools. None of these are flashy, but they pay for themselves in saved ammo and time.
- Torque wrench with common bits: For bases, rings, and action screws. Keep a small reference card with your rifle’s torque values.
- Bubble levels or anti-cant devices: One for the gun, one for the scope during setup. A small, rail-mounted level is a quiet advantage in the field.
- Boresighters: A simple laser boresighter is great for ARs and rimfires. For bolt guns, visual boresighting through the bore is free and fast.
- Scope ring lapping kit: Only if your rings truly need it. Properly machined mounts often don’t. Lapping can improve contact and reduce stress in budget rings.
- Protective caps and sunshades: Keep lenses clean. Sunshades reduce glare in bright conditions and can improve apparent image quality.
- Bubble-leveling target card: A DIY card with a vertical line helps you verify cant during practice. It’s simple and brutally effective.
Quick Reference Tables
Table: Typical zeros and their use-cases
| Zero | Use | Notes |
|---|---|---|
| 25-yard/25-meter zero | Pistol-caliber carbines, short-range rimfire, initial zeroing for close lanes | Expect a pronounced rise at 50–100 due to trajectory |
| 50-yard zero | AR-15 carbines, .22 LR small-game, general-purpose carbine work | Convenient for overlapping 200-yard impacts on many 5.56 loads |
| 100-yard/100-meter zero | Centerfire hunting rifles, long-range baseline, precision setups | Clean math for both MOA and MRAD; common manufacturer standard |
| 200-yard zero | Big-game rifles seeking extended point-blank range | Requires range access for confirm; know your close-range offsets |
Table: Parallax knob markings vs. reality
| Marking | Reality |
|---|---|
| 50 – 100 – 200 – ∞ | Use as a guide only. Set parallax by watching reticle float disappear at your actual distance. |
| Adjustable objective scopes | Same as above; AO rings are not absolute. Trust your eyes and reticle stability. |
Table: MOA vs MRAD “at a glance”
| System | Clicks | Mental Math | Best For |
|---|---|---|---|
| MOA | Commonly 1/4 MOA | 1 MOA ≈ 1 inch at 100 yards | Shooters who think in yards/inches; traditional hunting optics |
| MRAD | 0.1 mil | 1 click = 1 cm at 100 m | Metric shooters, precision disciplines, mil-based reticles |
FAQs: Straight Answers to Common Questions
What is windage vs elevation on a scope?
Windage adjusts left and right; elevation adjusts up and down. They move the reticle within the scope to shift your point of impact.
How many clicks is 1 inch at 100 yards?
- On a 1/4 MOA scope: about 4 clicks.
- On a 0.1 mil scope: about 3 clicks (0.3 mil ≈ 1.08 inches).
What is parallax on a scope?
Parallax is when the reticle appears to move relative to the target when your eye shifts behind the scope. It can cause misses even if the image looks sharp. Use the parallax (side focus) knob to set the target distance so the reticle no longer floats.
What magnification to use for setup?
Use moderate magnification for zeroing—enough to see your target clearly without making the eye box too tight. For a 3–9x, 6–8x works well. Cranking to max often adds wobble and fatigue.
Do you adjust reticle focus or parallax first?
Reticle focus (diopter) comes first and only once for your eye. After that, set parallax for each target distance.
MOA vs mil: which is better for adjustments?
Neither is “better.” MOA aligns with inches/yards; MRAD aligns with centimeters/meters. Choose based on your reticle and the system your partners use. Consistency trumps format.
Does temperature/altitude affect your zero?
Yes. Temperature shifts velocity; altitude changes drag. At short zero distances, you may see little change; at longer ranges, dope can shift significantly. Confirm in similar conditions when possible.
Why did my zero shift after transport?
Common causes are bumped turrets, mount screws settling, temperature swings, or stock pressure changes. Lock or cap turrets, recheck torque, and confirm zero on arrival.
Rifle Scope Adjustments for Aging Eyes
Re-do the diopter with your current glasses, moderate your magnification to widen the exit pupil, and consider a slightly bolder reticle or mild illumination to ease acquisition without flare.
What does 1 click on a scope mean?
It’s the smallest increment of adjustment. On most MOA scopes, one click is 1/4 MOA; on most MRAD scopes, one click is 0.1 mil. Translate that to inches or centimeters based on distance.
Which way to turn the scope turret?
Follow the arrows: “UP” on elevation raises point of impact; “R” on windage moves it right. If markings aren’t clear, verify with a few test clicks on paper.
Scope Tracking Test Explained
Shoot a group at zero. Dial up a known amount, shoot; dial right, shoot; dial down, shoot; dial left, shoot. You should form a box and return to the original zero. If not, something’s off in mounting or the scope.
Rifle Scope Adjustments for Specific Loads: .308, 6.5 Creedmoor, .30-06
The process is the same: zero cleanly, then build a dope card for your actual velocity and environment. These calibers differ in drop and wind drift at distance, but windage and elevation adjustments work identically. If you’re dialing a lot of elevation for long-range with a flatter cartridge like 6.5 Creedmoor, a canted base helps keep you in the scope’s sweet spot.
Field Notes and Real-World Habits
- Write it down: Keep a small dope card taped to your stock or inside a cap. Include zero distance, click values, and a few common ranges.
- Confirm the day before: Whether hunting or competing, fire a quick 3-shot check group after travel.
- Zero like you shoot: If you’ll be shooting from prone with a bipod, zero from prone with a bipod. If you’ll be shooting off sticks at game, confirm the point of impact off sticks.
- Hold wind, dial elevation: In variable winds, it’s faster and safer to hold wind using your reticle than to dial windage.
- Don’t chase one shot: Three to five rounds reveal the truth; a single flier just tells a short story.
Rifle Scope Adjustments in Low Light and Weather
- Low light: Increase magnification only as needed. A larger exit pupil (lower magnification on a given objective) helps brightness. Illuminate reticle sparingly to avoid bloom.
- Rain and fog: Hydrophobic lens coatings help, but posture matters—keep the eyepiece tilted just enough to shed droplets. Don’t crank the diopter to fix fog; manage the environment.
- Cold: Gloves complicate turret clicks. Pre-set critical holds if you expect to wear thick gloves; consider turrets with bold, tactile clicks.
Parallax vs Focus on a Scope: A Simple Mental Model
- Diopter is “your eye’s glasses” for the reticle. Set once.
- Parallax is “distance focus” for the target image and alignment. Set each time your target distance changes significantly.
- If the reticle moves when your eye moves, parallax is not set. If the reticle is fuzzy, diopter isn’t set.
How to Adjust a Rifle Scope at 100 Yards: A Practical Example
You fire a measured 5-shot group at 100 yards. The center of the group is 2.5 inches low and 1 inch right.
- MOA scope, 1/4 MOA clicks:
- Elevation: 2.5 inches ≈ 2.5 MOA; 2.5 ÷ 0.25 = 10 clicks UP.
- Windage: 1 inch ≈ 1 MOA; 1 ÷ 0.25 = 4 clicks LEFT.
- Fire another 3-shot group. If you’re now 0.5 inch high, dial 2 clicks DOWN.
- MRAD scope, 0.1 mil clicks at 100 meters (convert distance accordingly):
- If at 100 m you’re 6 cm low and 3 cm right:
- Elevation: 0.6 mil UP (6 clicks).
- Windage: 0.3 mil LEFT (3 clicks).
- Re-confirm with 3 shots and fine-tune.
- If at 100 m you’re 6 cm low and 3 cm right:
Scope Reticle Alignment and Leveling: A Field-Proof Method
- Hang a plumb line at your target backer.
- Level the rifle in a solid rest.
- Rotate the scope until the vertical crosshair matches the plumb line exactly.
- Tighten in steps, alternating screws, keeping the reticle aligned.
- Install a small anti-cant level on the rail or scope tube. In the field, check the bubble before any shot that demands precision.
Rifle Scope Adjustments for Long-Range and PRS-Style Shooting
- Choose MRAD or MOA based on your squad and training materials. MRAD with 0.1 mil clicks and FFP reticles is common in precision rifle circles.
- Set a reliable 100-yard/100-meter zero. Confirm parallax precisely; use a fine target.
- Set zero stop and note your first full revolution above zero.
- Build a ballistic profile using a chronographed velocity and validated data at real distances. Don’t trust predictions alone.
- Dial elevation; hold wind. Learn to read mirage and terrain funnels.
- Practice quick parallax changes for multi-distance stages. “Good enough” parallax with disciplined head position is sometimes better than perfect parallax if the clock is running.
Rifle Scope Adjustments for Deer Hunting Season
- Keep it simple: A solid 100-yard zero with a known hold at 200 and 300 covers most shots ethically. If you use a BDC reticle, verify where each hash lands with your actual load at the range.
- Low light: Favor a mid-power magnification that brightens the image and gives a forgiving eye box. Keep illumination low.
- Cold hands: Cap your turrets and rely on holds; gloves and exposed turrets can be a messy mix.
Common Mounting Pitfalls That Masquerade as Adjustment Problems
- Bases misaligned: If your windage is way off at mechanical center, check base alignment. Some two-piece bases allow windage adjustments; don’t “fix” a crooked base with extreme windage on the scope.
- Ring crush: Over-torqued rings pinch the erector tube and ruin tracking. If your adjustments feel sticky or non-linear, loosen and re-torque to spec.
- Height over bore confusion: At very close distances, your bore is lower than the line of sight through the scope. Expect to hit low at 10–15 yards even if zeroed at 100; this is not a “bad zero,” just geometry.
A Short, Practical Checklist
- Reticle focus (diopter): Set it first. Crisp on first glance.
- Eye relief: Full image at your working magnification, no scope shadow.
- Level: Rifle and reticle aligned to a plumb line.
- Torque: Bases and rings to manufacturer specs, evenly applied.
- Boresight: Get on paper without wasting ammo.
- Zero: Groups, not single shots. Confirm. Set zero stop.
- Parallax: Adjust until reticle float disappears at your distance.
- Dope: Build/verify your holds and clicks with your real ammo.
- Confirm after transport: It takes three shots and saves you headaches.
Closing Thoughts: Make the Scope Disappear
The best compliment a scope can get is that it “disappears” in use—no mental friction, no second-guessing, no fighting the glass. When windage and elevation adjustments do exactly what your hands intend, when parallax is tamed and the reticle is crisp and level, your attention returns to what matters: calling wind, managing the trigger, and breaking good shots on purpose.
How to adjust a rifle scope isn’t a bag of tricks; it’s a sequence. Fit, focus, level, mount, zero. Verify the math with MOA or MRAD you actually understand. Respect parallax, don’t rush the process, and keep your setup consistent. Whether you’re tuning a rimfire at 50 yards, setting up a crossbow speed ring for the fall woods, or dialing long steel with a precision rig, the same quiet truths apply. Do them in order. Do them carefully. And enjoy that moment when the reticle settles and the shot breaks with the calm certainty that everything is right where it should be.